888-871-6573
Call Toll Free

Call Toll Free
Call Toll Free
Learn how to install stainless steel banding correctly. Step-by-step guidance on tools, buckles, tensioning, and safety for a secure, lasting hold.
Last Updated: October 13, 2026
Stainless steel banding is a corrosion-resistant metal strapping system used to secure poles, pipes, signs, and structural supports in harsh outdoor environments. The install is only as good as the prep.
Here’s what you need on hand before you touch a pole:
The Canadian Centre for Occupational Health and Safety guidance on hand and eye protection is a solid reference for choosing the right PPE for metal strapping work. Most failed installs trace back to mismatched parts, not bad technique.
A stainless steel banding tool does three jobs in sequence: it grips and pulls the tail to tension the band, it locks or crimps the buckle, and it cuts the tail flush.
Most manual tensioners work on a ratchet-and-pawl principle. You feed the band tail into the tool’s nose slot, close the handle to engage the gripper, and squeeze repeatedly.
Load the band into the feed slot, thread it through the buckle, then crank or trigger the tensioner until the band is snug. Every tool has a tension setting.
Tensioners usually expose one of three controls: a numbered dial, a spring-loaded tension knob, or a shear pin that snaps at a set load.
A practical way to set tension without a spec sheet: band a scrap piece of the same pipe or pole you are working on, tension it, crimp it, then try to rotate or slide the band by hand.
Manual tensioners suit low-volume work, tight spaces, and small crews. They’re slower but give you fine control on delicate runs, and they need no power source.
Drill-powered tensioners cut install time on long runs and high-volume jobs. They pull consistent tension across hundreds of ties, which matters when you’re banding a utility corridor. The trade-off is weight, cost, and the need for a charged battery or corded power at the work face.
| Tool Type | Best For | Trade-Off |
|---|---|---|
| Manual tensioner | Small jobs, tight access | Slower per tie |
| Drill-powered tensioner | High-volume runs | Needs a power source |
| Ratchet cutter | Cutting thick band | Not a tensioner |
| Combination tool | Tension, crimp, and cut in one pass | Higher cost, bulkier nose |
Tool and band have to match on two dimensions: band width and band thickness. A tool rated for a specific band width will not feed a wider band cleanly, and a light-duty gripper will slip on heavy-gauge band instead of pulling it. Check the tool’s rated band range before you start. If the gripper slips, the cause is usually a worn gripper jaw or a band that is thicker than the tool’s rating, not a technique problem.
The right fastener depends on your band width, load, and environment. Stainless steel banding clips and buckles come in a few core types, and picking the wrong one is the most common cause of premature failure.
Match the buckle to the band thickness. A thin buckle on a thick band won’t crimp cleanly, and a loose crimp is where corrosion starts.
Installing stainless steel banding takes three stages: prep, wrap and tension, then crimp and cut. Each stage has one job, and rushing any of them shows up later as a loose or broken tie.
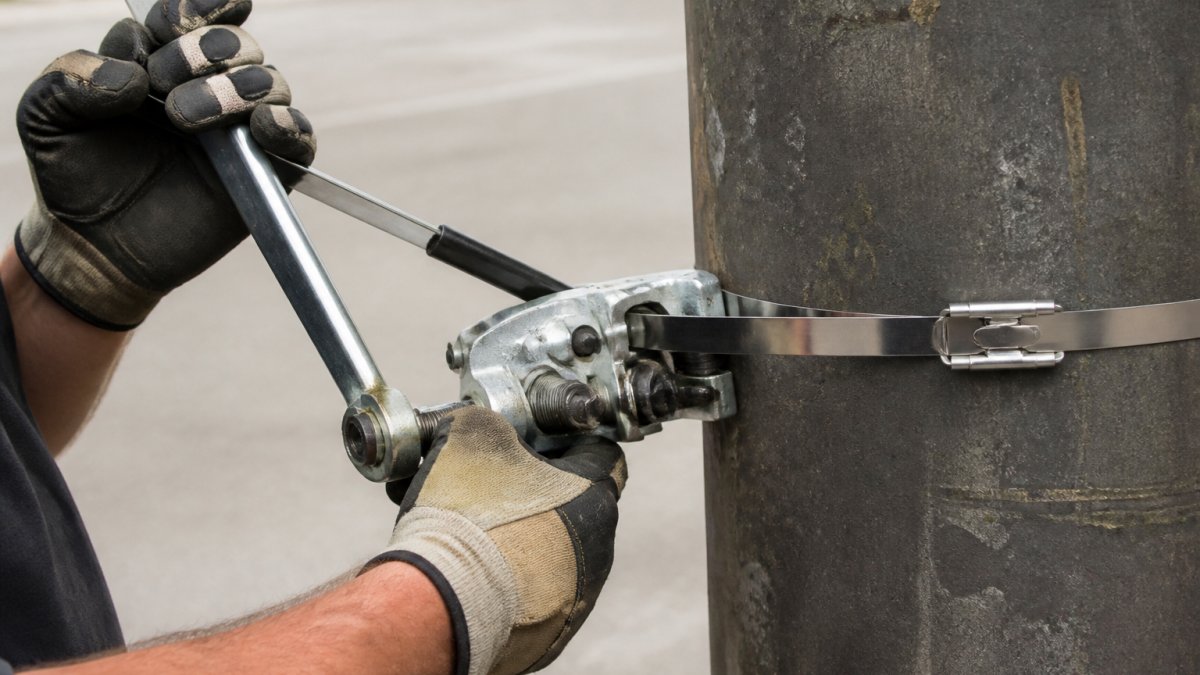
Measure your wrap length first. Add enough band to go around the support plus about 10 cm of tail for the tool to grip.
A clean work area prevents dropped buckles and scratched band. On a ladder or mast, stage everything in a pouch before you climb.
Wrap the band around the pole or pipe, then feed the tail through the buckle. Pull it hand-tight so the band sits flat with no twists.
Engage the tool on the tail and apply tension. Watch the band seat against the surface. Stop when the band is firm and the buckle is snug, not when the tool maxes out.
Crimp the buckle with the tool’s crimping jaw, or use a separate crimper if your tool doesn’t combine the two. A clean crimp bites into the buckle and locks the band in place.
Then cut the excess tail. Leave a short stub, about 1 cm, and cut it flat. A long or jagged tail is a cut hazard and a snag point.
Stainless steel banding safety comes down to two hazards: cut edges and stored tension. Band edges are sharp, and a tensioned band holds real energy.
For work at height or on live utility infrastructure, follow your site’s lockout and fall-protection rules. The CSA Group standards for personal protective equipment cover the gear side of that.
Stainless steel banding applications for pipes and signs share one requirement: a hold that survives weather, vibration, and time. What changes between them is the substrate, the load path, and the risk of damage if you over-tension. This section walks through how the method shifts by application, which is the part most guides skip.
On bare pipe, the band seats directly on the metal.
For cladding and metal jacketing over insulation, band on the seams and at intervals along the run so the jacket cannot lift in wind.
For trace heating, band over the heat trace without pinching it. A crushed heat trace cable is a failure you will not see until the line freezes.
Pole ties and cable supports are the highest-volume use. On wood poles, the band seats into the surface slightly, which is normal. On metal or concrete poles, deburr the contact area first so the band does not chafe against a sharp edge.
For telecom and utility hardware, band at the height the hardware drawing calls for, and keep the buckle on the side of the pole away from the traffic or climbing face.
On signs, banding mounts panels to posts where bolts will not fit or where you cannot drill the post. Band around the post and through or over the sign’s mounting bracket, then tension and crimp.
Sign banding is also where grade selection matters most. A sign in coastal air or near a roadway with winter salt exposure will pit a low-grade band within a season.
Grade selection is an application decision, not a preference. For general construction, HVAC, and inland work, 304 handles most jobs. For marine, coastal, and oil and gas work, choose 316 for salt and chemical exposure.
Match the buckle grade to the band grade. A mixed-metal joint is where corrosion starts, because the two grades sit at different potentials and the less noble one gives up metal first.
| Application | Typical Grade | Buckle Type | Watch For |
|---|---|---|---|
| Insulated pipe and cladding | 304 | Wing-seal or ear-lok | Crushing insulation |
| Utility and telecom pole ties | 304 or 316 | Screw-fastened | Buckle on climb face |
| Signs in coastal or salted areas | 316 | Screw-fastened | Mixed-grade joints |
| Marine and oil and gas | 316 | Same grade as band | Chloride pitting |
| Indoor or short-life | 201 | Wing-seal | Not for wet or chloride exposure |
Band-N-Go stocks many banding widths, thicknesses, and coatings so you can match the grade to the environment. We also supply utility and shipbuilding crews with custom sizes and packaging, with no minimum order.
Most banding failures come from four fixable problems:
| Problem | Cause | Fix |
|---|---|---|
| Band slips | Loose crimp | Re-crimp with matched buckle |
| Buckle breaks | Wrong band thickness | Use matched band and buckle |
| Corrosion at joint | Mixed metal grades | Use same-grade parts |
| Band cuts pipe | Over-tensioned | Lower tool tension setting |
If a band loosens under vibration, the buckle is usually the culprit. Switch to a screw-fastened buckle for heavy-vibration runs. If corrosion appears at the joint, your band and buckle are different grades. Match them.
Check every tie after install: firm tension, flat seat, clean crimp, short tail. A two-second check catches most problems before they cost you a callback.
Tension depends on the application and band thickness. For cable or pipe support, the band should be snug enough that it cannot slide by hand but not so tight that it crushes insulation or deforms the pipe. Drill-powered tensioners have a clutch setting that stops at a preset torque to prevent over-tensioning. Always follow the banding manufacturer’s instructions for your specific band width and thickness. A clean crimp on a properly tensioned band holds far better than an over-tightened one that has stretched or damaged the buckle.
You need a banding tensioner (manual or drill-powered), a crimping or sealing tool, and a cutter designed for stainless steel. Safety glasses and cut-resistant gloves are essential because band edges are sharp. For some buckles you also need a screwdriver or wrench. Match your tool to the band width and thickness: a light-duty tensioner will not pull a heavy-gauge band to the correct tension, and a heavy tool can crush thin band. Check tool compatibility with your banding supplier before you start a large job.
No. Once a band is crimped and cut, it cannot be safely reused. The crimp deforms the buckle and band, and cutting leaves a shortened strap. Removing banding also creates sharp edges. For temporary or adjustable holds, use a reusable clamp or bolt-on bracket instead. Plan your band lengths so you minimize waste, and keep spare buckles and band on hand for adjustments. Stainless steel banding is designed for permanent or semi-permanent fastening, not for repeated open-and-close cycles.
Thread the band through the buckle, pull it to the target tension with your tensioner, then crimp the buckle with a sealing tool. The crimp locks the band in place. After crimping, cut the excess band as close to the buckle as possible and file or deburr the cut edge so no sharp tail remains. For extra security in high-vibration settings, some installers add a second crimp or use a locking clip. Always inspect the crimp to confirm it is fully closed before releasing the tensioner.
Stainless steel banding holds up when the parts match and the crimp is clean. The hard part is sourcing the right band, buckle, and tool for your environment without a long lead time. Band-N-Go stocks many widths, thicknesses, and coatings, offers custom sizes and packaging, and ships fast with no minimum order. Get your free quote today and secure your next install with confidence.